Cute Tweety Bird Drawing For Kids | Tweety Bird Drawing For Kids Tutorial
Tweety Bird Drawing For Kids
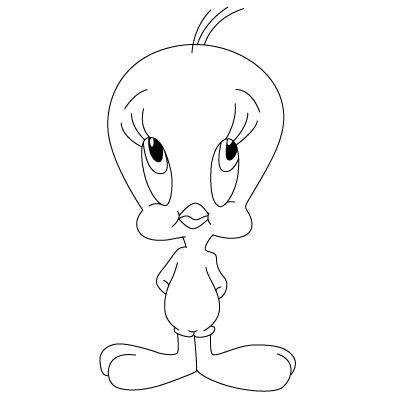
Drawing Instructions for Kids and Beginners: How to Draw Tweety Bird in a Few Simple Steps. Watch and study this digital drawing tutorial to learn how to draw bright things, animals, and your favorite characters. You may also remove this on paper using the supplies for drawing and sketching listed below.
For other beautiful drawings, visit Drawing For Kids
In 1941, Tweety Bird made his film debut. Tweety's backstory was finished by 1949. He and a bulldog named Hector or Spike belonged to the watchful Granny. Tweety was no longer a solitary, tree-dwelling bird. Tweety frequently battles Sylvester the cat, who wants to devour the little bird.
No special pens or tools are required. All you need is a standard pencil, an eraser, and some paper.
Step 1:
- The first thing that may strike a person about Tweety Bird is how much bigger his head is than his body.
- We'll start with a sketch of his head for the first phase of our tutorial on how to draw Tweety Bird. To create, draw a large circle for his head's crown. It almost looked like a light bulb because it was tall and rounded.
- His big cheeks will then be drawn underneath this head. We'll utilize two considerably smaller curves at the base of his skull contour to achieve this.
- Due to the location of his head around his body, there will be a small space between these two lines.
Step 2:
- Next, sketch Tweety Bird's facial features.
- You can now paint some facial elements for your Tweety Bird design in this phase since you've already contoured his head. We'll begin with its tiny beak first.
- Two distinct shapes will be merged to form this shape, and they will be oriented so that it appears he is grinning.
- Add a curved line to the right side of his mouth for added cuteness.
- Finally, we'll sketch up his eyes, which will be long and rounded with big pupils.
- Finish by adding three more curves to the top for some hair and three curled lashes for each eye.
Step 3:
- Commence sketching Tweety's body.
- Even though Tweety's body is abnormally tiny compared to his head, this only makes him sweeter! In the following section of the Tweety Bird tutorial, we'll begin drawing his body.
- To begin, create two little curves from the base of his head to represent his short, delicate neck. Then add a curved line connecting them for his shoulders, followed by another line for his chest on the opposite side.
- Then, using more curved lines that end in pointy tips, he finishes his story by adding one final rounded line to his back.
- There is nothing left to do now, so let's go!
Step 4:
- Draw his arms and begin to extend his legs.
- In this tutorial, Tweety is in a particularly adorable stance, made even cuter by the way he clasps his hands in front of his face.
- For this stage of your Tweety Bird drawing, we will draw this. We'll utilize some curved lines that start close to where you sketched the bulge for his shoulder to accomplish this.
- Then, we'll sketch his tiny fingers where his hands are clasped. Don't be scared to meticulously mimic the reference image as you draw—this stage can be more complex than you think.
- His torso will eventually develop two tiny lumps where his legs will stretch.
Step 5:
- Add a few more pins and finishing touches.
- It's time to complete the drawing so you can go on to the last section of this Tweety Bird tutorial. Both his head and legs are huge for his frame.
- But since they are pretty easy to shape, drawing them should be simple enough. Just add some short legs and some large, rounded outlines for his two-toed feet.
- You're ready for step 6 after drawing the outline! You can also add a few of your own details before moving on.
- Perhaps you could illustrate Tweety's surroundings or depict Sylvester skulking in the distance.
- Perhaps you could create Tweety's background settings or depict Sylvester hiding in the shadows.
Step 6:
- Add color to complete your Tweety Bird drawing.
- To complete it, you can add color to the Tweety Bird drawing in this last stage. For this character in our reference image, we used traditional colors.


Comments
Post a Comment